LED DomeHead Costume with Raspberry Pi
This was a wearable art piece that I made for Burning Man 2017. The frame was designed in Autodesk's 123D and cut on a X-Carve CNC machine. A Python program running on a Raspberry Pi manages input from the buttons on the chest (animation select, speed, and random mode) as well as output to the addressable LEDs. A Fade Candy by Adafruit is used to help smooth the lighting effects. There is a 5 inch HDMI monitor mounted internally for the wearer to see. It is connected to a low light, fish eye lens camera on the chest. The system could run for hours on a bank of 5V usb batteries worn on the back. The dome was mounted on a BMX chest armor, which made it very stable and easy to move in.
Motivation
This project was an excuse to practice a number of skills I was interested in developing at the time, including working with addressable LEDs, RaspberryPi, CNC milling, and programming in Java. The year before I had made a trench coat for Burning Man that was covered in a matrix of 64 RGB LEDs. They were not addressable LEDs, so to control them I had to do some tricky multiplexing (64 LEDS x 3 pins for each color = 192 = way more more than the GPIOs on any muliticontroller!). I used a Rainbowduino board and the fun Pixel Invaders software (sadly no longer supported) to create some fun animations on the costume. However, all the careful wiring and low pixel count made it feel like the juice wasn’t worth the squeeze. I’d been hearing about addressable LED’s for a while, but the price point was still a little higher than I wanted, so I eased myself in slowly.
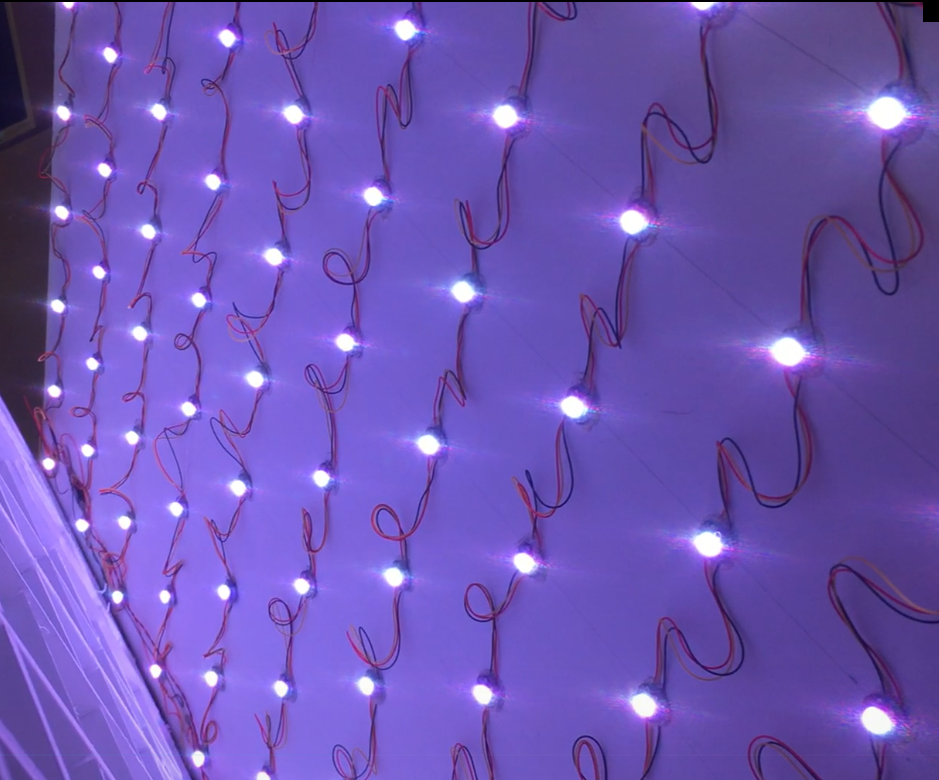
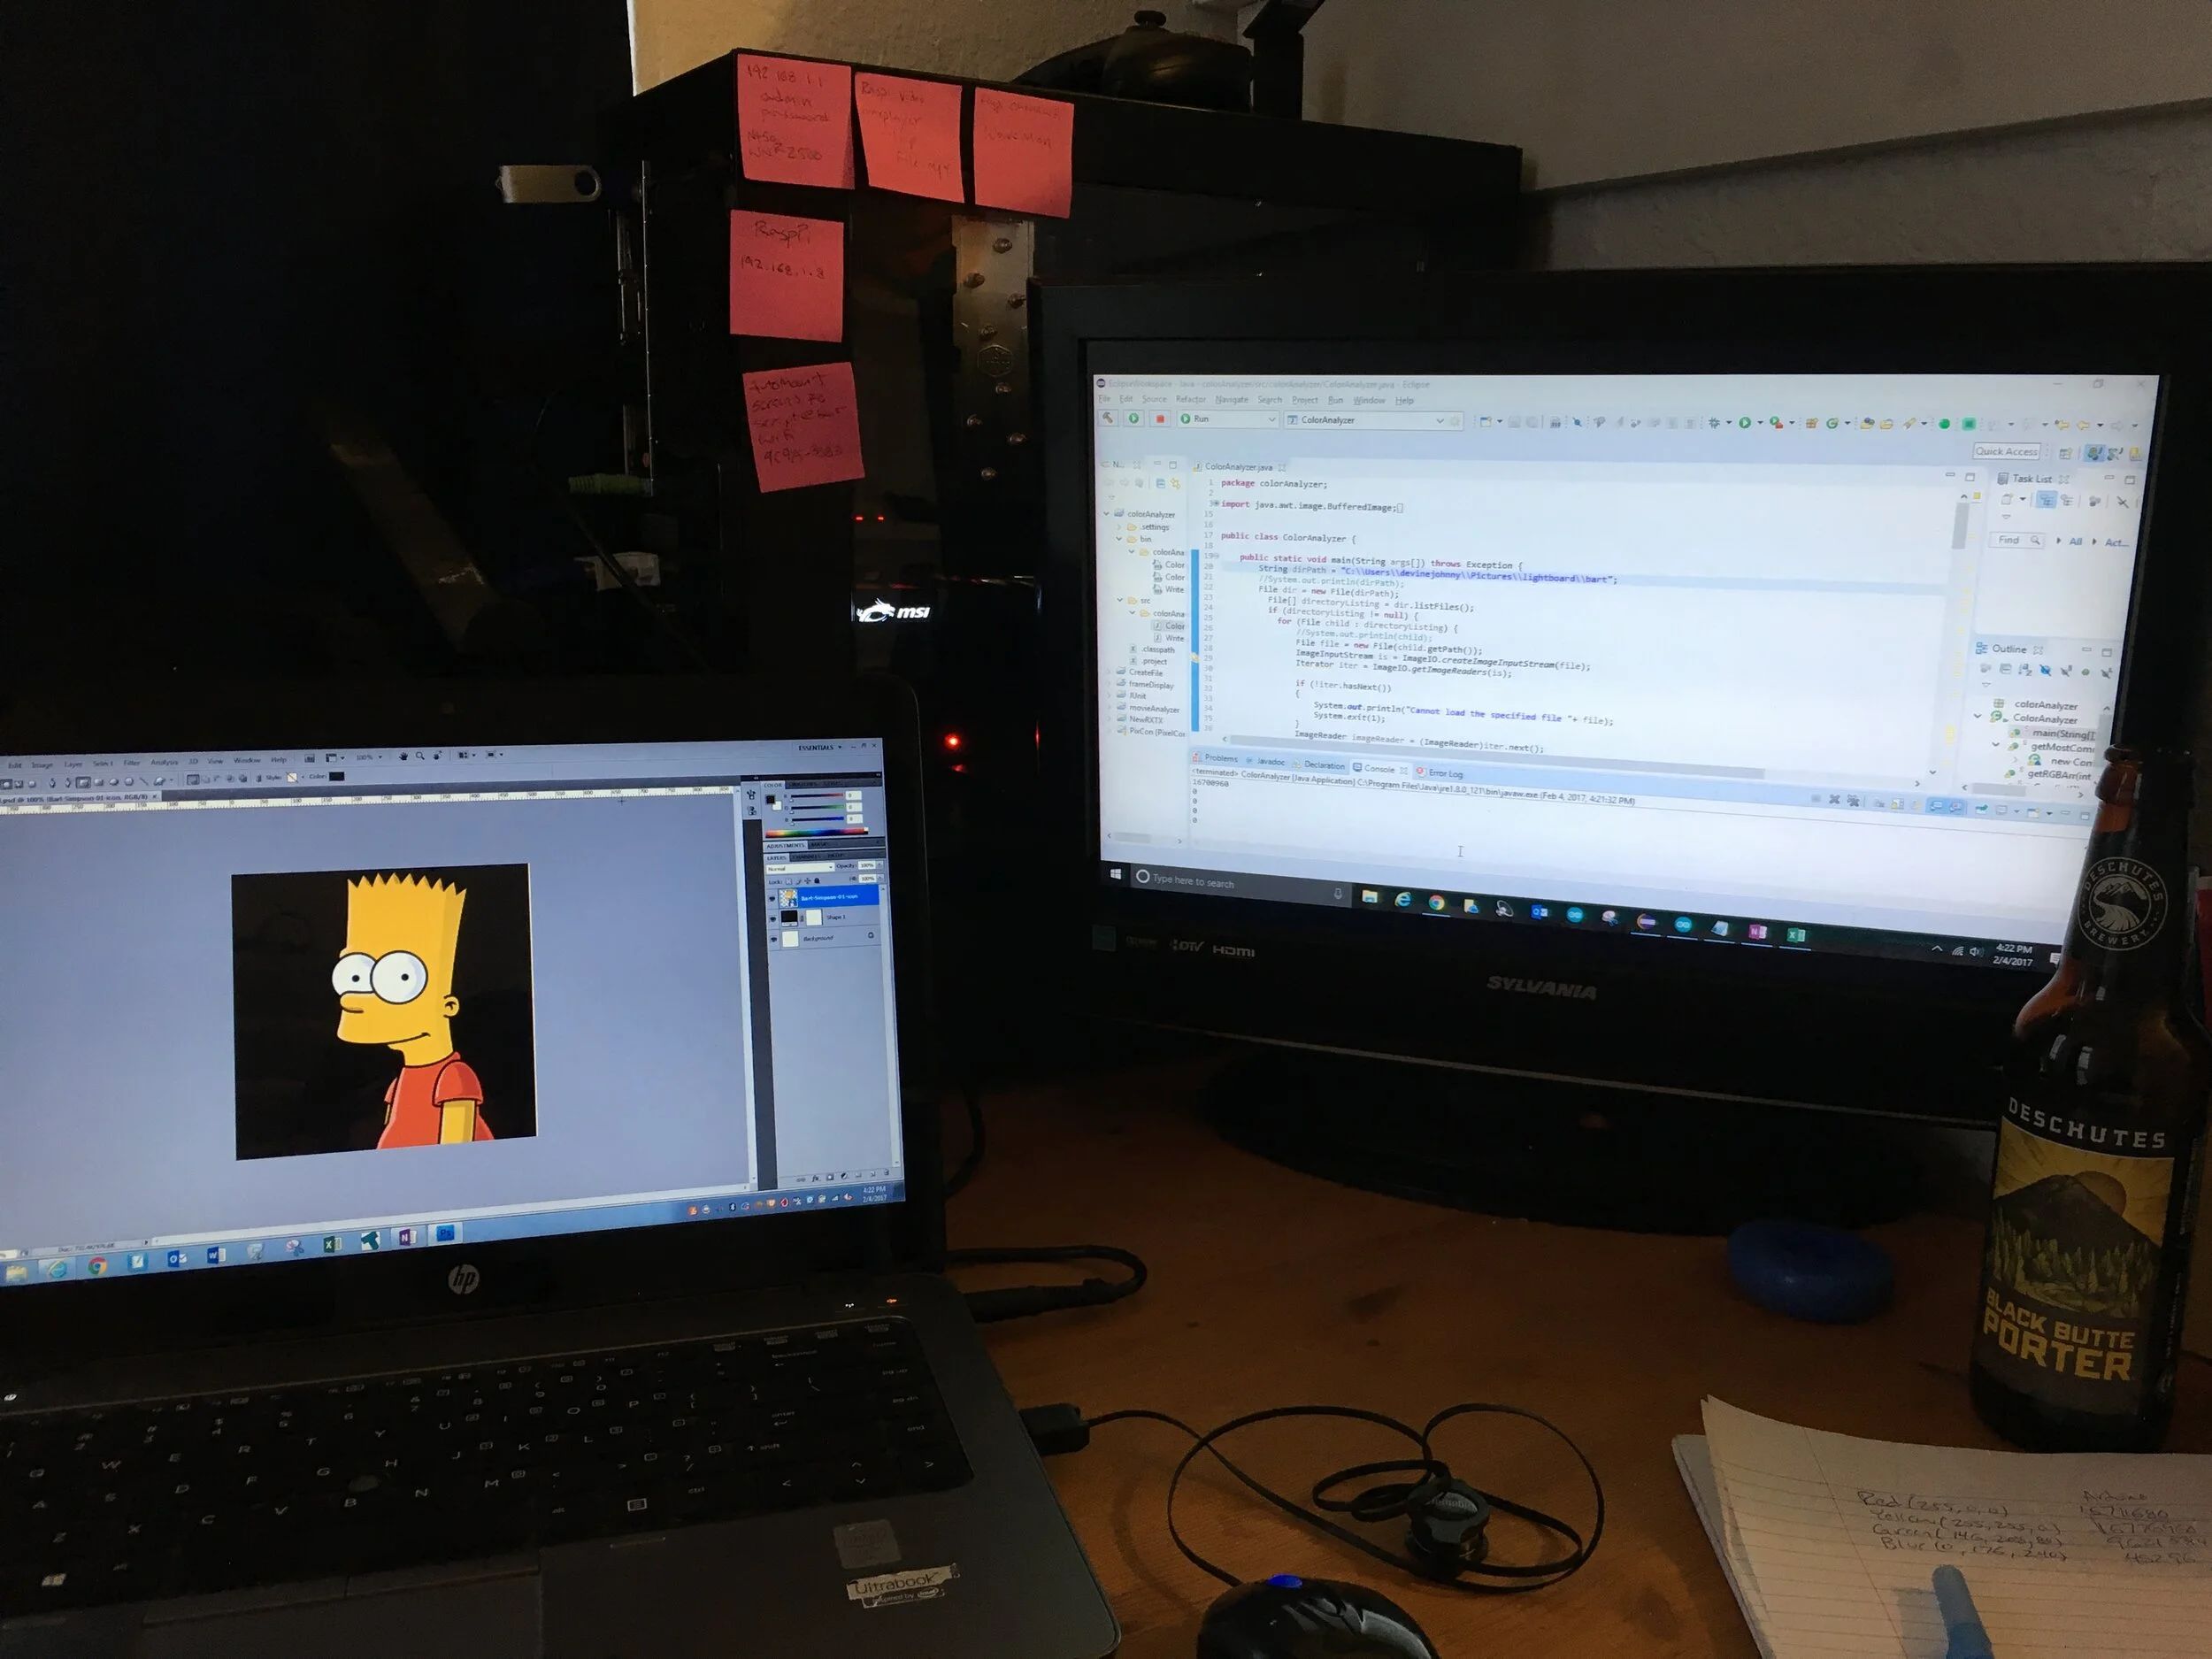
My first experimentation with addressable LEDs began with a 10 x 10 matrix using CHINLY WS2812B LEDS that were packaged on a single circuit board and could be snapped apart from each other. This required soldering wires to each LED and I quickly learned the importance of using heavy gauge wire and providing power to the LEDS in parallel at multiple points, as the LEDs at the end of the strip would brown out. I used the Adafruit NeoPixel libraries to get the board lit up using an Arduino Uno, but wanted to do more complicated things. My first goal was to map a low resolution image to the 100 addressable LEDs. I didn’t see how this could be done with Arduino alone, so I downloaded the Eclipse IDE and dipped my toe into Java programming. I created a program (a version of which is included at the bottom this page) that would open an image, divide it into a 10 x 10 grid, measure the most common color in each cell, and write that information to a text file. I then wrote a program for my Arduino that would read the text file off an SD card and use that information to set the color of each LED in the matrix. The image of Bart Simpson below was one of my first successes.


As a next step, I wanted to use the LED matrix as a low resolution monitor that could display moving images. Since I already had the Java program written to create still images, I figured I would just expand on this idea by treating animations as a series of still images, displayed in sequence. I found that animations could be created in Adobe Flash (or GIFs could be imported), then those animations could be exported as a collection of PNG image files. I tweaked my Java code so it would process batches of images all at once, creating a large text file that contained some metadata at the beginning (like how many frames were in the animation). After some minor changes on the Arduino, like making it aware of how many frames were in the animations so it knew when to repeat and what the frame rate was (how long to pause between each display), I had things up and running.
This is the basic idea that I used in the DomeHead costume. I retired the LED matrix project by converting it into an interactive piece of wall art. Three ultrasonic distance sensors were mounted underneath the matrix, which controlled the balance of red, green, and blue light displayed by the LEDs. This hung on the wall of my classroom for a couple years and I used it in physics lessons to explain properties of light. The video below shows more.
This is a project I used to explore applications of WS2812B addressable LEDS. The LEDs are produced by CHINLY but required hand soldering to connect them. They were mounted on laser cut foam and covered with a diffusing plastic cover (used for florescent light covers). The LEDs were first tested with Adafruits excellent NeoPixel library and an Arduino Uno. I then wrote a Java program that was used to map any image to the matrix. That Java program was expanded to include animations. Lastly, the matrix was retired as an interactive piece of wall art that used three distance sensors to change the balance of red, green, and blue light displayed by the LEDs.
Process
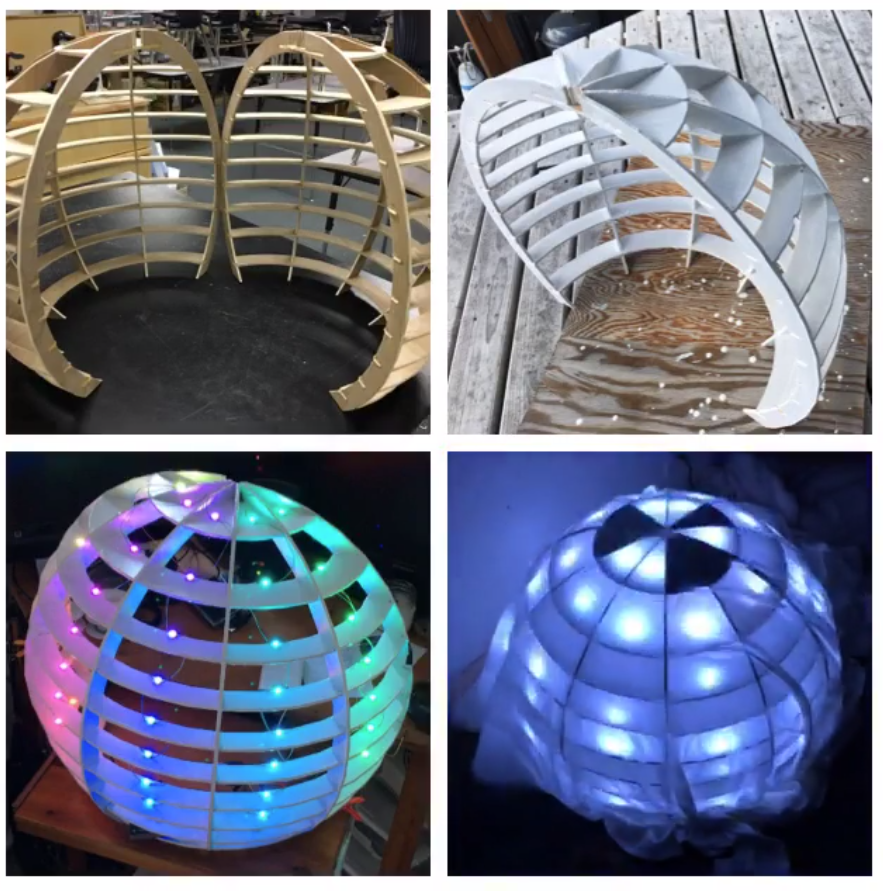
Based on what I learned with the flat matrix of addressable LEDs described above, I saw a way to improve my wearable LED costume ideas. I had already seen lots of other people at Burning Man making jackets covered with LEDs so I decided to go in a different direction: the head. I first set about creating the dome that would fit over the head. I used Autodesk’s web-based TinderCAD program to create the hollow sphere, then used their 123D program to slice sheets that could be milled on a CNC. 123D is no longer a stand alone program, but the same functionality can be found in their other products, notably Fusion 360 (still free for hobbyists and educators). I divided up the shape so that it would have 100 separate cells, just like I had practiced with the flat panel.
I used an X-Carve CNC machine that I won for my classroom in a national competition to cut out the panels, then assembled them with a bit of wood glue. I split the sphere in to two halves so I would be easier to pack up and transport.


I spray pained the wood white to help with light reflection and set about wiring in the same CHINLY LEDs that I had used in my flat panel. I found these LEDs didn’t produce a multi-directional light and were difficult to power with the thin gauge wire I was using, so I tore them out and upgraded to ALITOVE WS2811 addressable LEDs that came pre-wired with diffusing caps on top the LEDs. I bought some old bed sheets from Goodwill and tried two different approaches for covering the dome. I first cut and sewed a dodecahedron pattern to cover the dome, but found the pattern distracting, so I instead used a wedge design (the seams in the stitching matched up well with the vertical wood beams).


Wearing the dome on the head required two challenges to be solved. First, how to support it and still move around, and second, how to see. For the first challenge I considered suspending a construction helmet in the middle of the sphere, but this turned out to make the sphere too wobbly. While looking for other types of helmets that might be more secure at a used sporting goods store I stumbled across some BMX chest armor. The armor had strong straps, padding, and solid plastic around the neck and shoulders. I spray pained the red plastic white and used some PVC pipe and other hardware store miscellanea to secure the two together (while still allowing a way to separate them for transportation and storage).


For the issue of seeing, I mounted a small fish eye lens camera on the chest and streamed the image to a 5” monitor inside the dome. This was all powered by a Raspberry Pi. I have more details about how to set up one of these monitors with a Pi in another project write up. Since the Pi was needed for vision anyway, I used it to run the light animations in place of the Arduino that I used in my flat panel experiments. I also used a FadeCandy board, made by Adafruit, to smooth out the transitions between the animation frames. I had a couple extra GPIO pins on the Raspberry Pi that weren’t used by the monitor, so I added some control buttons on the chest too (random mode, pattern select, animation speed). The Python code for the animation and button inputs is below. I powered the whole project with a bank of 5V charge packs on my back and as a last touch I covered the back of each cell with plastic to prevent color from one cell lighting up its neighbors.


Code
# Controls all operations of the DomeHead costume.
# Animations were created in Adobe Flash, then exported as a collection of images.
# A separate java program broke each image into 100 cells, then converted the average color of each cell to a set of three numbers (red, green, blue).  These numbers were written to another file, which is what was ultimately used to animate the LEDs.
# Johnny Devine 2018

import opc, os, subprocess, time, random, math
import RPi.GPIO as GPIO

client = opc.Client('localhost:7890')  #communication with FadeCandy server
animationList = os.listdir("/home/pi/fadecandy/domeHead/dhAnimations")
numLEDs = 100
buttonPushes = 0
butUpPin = 35
butDownPin = 36
speedUpPin = 37
slowDownPin = 38
escapePin = 40
randPin = 33
randLED = 32
randMode = False
timeStep = 0.01
sleepTime = 0.1
minSleepTime = 0.01
interupt = False

GPIO.setmode(GPIO.BOARD)
GPIO.setwarnings(False)
GPIO.setup([butUpPin, butDownPin, randPin, slowDownPin, speedUpPin, escapePin], GPIO.IN, pull_up_down = GPIO.PUD_UP)
GPIO.setup(randLED, GPIO.OUT, initial = GPIO.LOW)

# what happens if Random Button is pressed
def randomMode(channel):
    global randMode, interupt
    print('randMode pressed!')
    if randMode == False:
        randMode = True
    else:
        randMode = False
    interupt = True

# what happens if Up Button is pressed
def butUpPush(channel):
    global buttonPushes, animationList, interupt
    print('up button pressed!')
    if buttonPushes == len(animationList) - 1:
        buttonPushes = 0
    else:
        buttonPushes = buttonPushes + 1
    interupt = True

# what happens if Down Button is pressed
def butDownPush(channel):
    global buttonPushes, animationList, interupt
    print('down button pressed!')
    if buttonPushes == 0:
        buttonPushes = len(animationList) -1
    else:
        buttonPushes = buttonPushes - 1
    interupt = True

# what happens if Speed Up button is pressed
def speedUp(channel):
    global sleepTime, timeStep, minSleepTime
    print('speedUp pressed!')
    if sleepTime >= minSleepTime + timeStep:
        sleepTime = sleepTime - 0.1*sleepTime

# what happens if Slow Down button is pressed
def slowDown(channel):
    global sleepTime, timeStep
    print('slowDown pressed!')
    sleepTime = sleepTime + 0.1*sleepTime
    #time.sleep(0.1)

# what happens if Escape pin is grounded
def escape(channel):
    print("ESCAPE")
    GPIO.cleanup()
    exit()

# interrupts for button presses
GPIO.add_event_detect(randPin, GPIO.BOTH, callback = randomMode, bouncetime = 300)
GPIO.add_event_detect(butUpPin, GPIO.FALLING, callback = butUpPush, bouncetime = 300)
GPIO.add_event_detect(butDownPin, GPIO.FALLING, callback = butDownPush, bouncetime = 300)
GPIO.add_event_detect(speedUpPin, GPIO.FALLING, callback = speedUp, bouncetime = 300)
GPIO.add_event_detect(slowDownPin, GPIO.FALLING, callback = slowDown, bouncetime = 300)
GPIO.add_event_detect(escapePin, GPIO.FALLING, callback = escape, bouncetime = 300)

def playAnimation(cycles, fileNumber):
    global interupt
    file = open('/home/pi/fadecandy/domeHead/dhAnimations/' + animationList[fileNumber], 'r')
    line_list = file.readlines()
    numFrames = line_list[0].split()
    intNumFrames = int(numFrames[0])

    currentFrame = 0
    currentReadLine = 1

    while currentFrame <= intNumFrames-1:
        if interupt == True:
            print('interupt!')
            break
        pixCount = 0
        frame = [ (0,0,0) ] * numLEDs
        while pixCount < numLEDs:
            r, g, b = (int(val) for val in line_list[currentReadLine].split())
            frame[pixCount] = (r,g,b)
            pixCount = pixCount + 1
            currentReadLine = currentReadLine + 1
        currentFrame = currentFrame + 1
        client.put_pixels(frame)
        time.sleep(sleepTime)

while True:
    interupt = False
    if randMode == True:
        GPIO.output(randLED, GPIO.HIGH)
        cycleCount = 0
        randCycleLength = random.randint(3,5)
        randFile = random.randint(0,len(animationList)-1)
#       print('random mode: cycles = ' + str(randCycleLength) + ' file = ' + str(animationList[randFile]))
        while cycleCount <= randCycleLength:
            if interupt == True:
                print('interupt again!')
                break
            playAnimation(randCycleLength,randFile)
            cycleCount = cycleCount + 1
    else:
        GPIO.output(randLED, GPIO.LOW)
#       print("button mode: button pushes = " + str(buttonPushes) + " file = " +  str(animationList[buttonPushes]))
        playAnimation(1,buttonPushes)
GPIO.cleanup()
exit()
Code for converting animations to form needed for DomeHead.py
package colorAnalyzer;

import java.awt.image.BufferedImage;
import java.io.File;
import java.util.Collections;
import java.util.Comparator;
import java.util.HashMap;
import java.util.Iterator;
import java.util.LinkedList;
import java.util.List;
import java.util.Map;
import javax.imageio.ImageIO;
import javax.imageio.ImageReader;
import javax.imageio.stream.ImageInputStream;
import java.io.PrintWriter;

public class ColorAnalyzer {

    public static void main(String args[]) throws Exception {
    //This path should point towards the folder that contains the collection of images that make the animation:
        String dirPath = "C:\\Users\\devinejohnny\\Pictures\\lightboard\\rainbow";

    //Change the name of this .txt file to describe the animation
        PrintWriter endFile = new PrintWriter( "rainbow.txt", "UTF-8");

        File dir = new File(dirPath);
        File[] directoryListing = dir.listFiles();

        if (directoryListing != null)
        {
            for (File child : directoryListing) {
                //System.out.println(child);
                File file = new File(child.getPath());
                ImageInputStream is = ImageIO.createImageInputStream(file);
                Iterator iter = ImageIO.getImageReaders(is);

                if (!iter.hasNext())
                {
                    System.out.println("Cannot load the specified file "+ file);
                    System.exit(1);
                }
                ImageReader imageReader = (ImageReader)iter.next();
                imageReader.setInput(is);
                BufferedImage image = imageReader.read(0);

                // number of pixels in total image height and width:
                int imageHeight = image.getHeight();
                int imageWidth = image.getWidth();

                // number of columns and rows in my output device:
                int cellCols = 10;
                int cellRows = 10;

                // number of pixels in an individual cell's height and width:
                int cellWidth = imageWidth / cellCols; //it appears these round to int value
                int cellHeight = imageHeight / cellCols;

                // used to debug order
                int neoPix = 0;
                //System.out.println("image height= "+imageHeight+"  and width= "+imageWidth);


                for (int cr = cellRows ; cr > 0; cr--) //every row, starting at the bottom
                    {
                    //System.out.println("(cellRows-cr)%2 = "+ (cellRows-cr)%2);
                    //if the difference between the total rows and current row doesn't give a remainder of zero when divided by two, reverse direction
                    if ((cellRows-cr)%2 == 0)
                        {
                        for(int cc = 1 ; cc < cellCols+1 ; cc++) //each column in that row, moving right
                            {
                            Map m = new HashMap();
                            for(int i=(cc-1)*cellWidth; i < cellWidth*cc ; i++)
                                {
                                    for(int j=(cr-1)*cellHeight; j < cellHeight*cr ; j++)
                                    {
                                        int rgb = image.getRGB(i, j);
                                        int[] rgbArr = getRGBArr(rgb);
                                        Integer counter = (Integer) m.get(rgb);
                                        if (counter == null)
                                            counter = 0;
                                        counter++;
                                        m.put(rgb, counter);
                                        /*// Filter out grays....
                                        if (!isGray(rgbArr)) {
                                                Integer counter = (Integer) m.get(rgb);
                                                if (counter == null)
                                                    counter = 0;
                                                counter++;
                                                m.put(rgb, counter);
                                        }*/
                                    }
                                }

                            String colourHex = getMostCommonColour(m);

                            //System.out.println("cell height "+ (cr-1)*cellHeight +" to "+ cellHeight*cr +"; cell width "+ (cc-1)*cellWidth + " to "+ cellWidth*cc);
                            //System.out.println("NeoPixel "+neoPix+". Row: "+cr+". Column: "+cc+". color is: " + colourHex);
                            endFile.println(colourHex);
                            m.clear();
                            neoPix++;
                            }

                        } else
                            {
                            for(int cc = cellCols ; cc > 0 ; cc--) //each column in that row, now moving right
                                {
                                Map m = new HashMap();
                                for(int i=(cc-1)*cellWidth; i < cellWidth*cc ; i++)
                                    {
                                        for(int j=(cr-1)*cellHeight; j < cellHeight*cr ; j++)
                                        {
                                            int rgb = image.getRGB(i, j);
                                            int[] rgbArr = getRGBArr(rgb);
                                            Integer counter = (Integer) m.get(rgb);
                                            if (counter == null)
                                                counter = 0;
                                            counter++;
                                            m.put(rgb, counter);
                                        /* // Filter out grays....
                                            if (!isGray(rgbArr)) {
                                                    Integer counter = (Integer) m.get(rgb);
                                                    if (counter == null)
                                                        counter = 0;
                                                    counter++;
                                                    m.put(rgb, counter);
                                            }                */
                                        }
                                    }

                                String colourHex = getMostCommonColour(m);
                                //System.out.println(m);
                                //System.out.println("cell height "+ (cr-1)*cellHeight +" to "+ cellHeight*cr +"; cell width "+ (cc-1)*cellWidth + " to "+ cellWidth*cc);
                                //System.out.println("NeoPixel "+neoPix+". Row: "+cr+". Column: "+cc+". color is: " + colourHex);
                                endFile.println(colourHex);
                                m.clear();
                                neoPix++;
                                }
                            }
                }

            }
          } else {
              System.out.println("Cannot load the specified directory "+ dirPath);
              System.exit(1);
          }
        endFile.close();
        System.out.println("All done!");
    }


    public static String getMostCommonColour(Map map) {
        List list = new LinkedList(map.entrySet());
        Collections.sort(list, new Comparator() {
              public int compare(Object o1, Object o2) {
                return ((Comparable) ((Map.Entry) (o1)).getValue())
                  .compareTo(((Map.Entry) (o2)).getValue());
              }
        });
        Map.Entry me = (Map.Entry )list.get(list.size()-1);
        int[] rgb= getRGBArr((Integer)me.getKey());
        //System.out.println("Red: " + rgb[0] + "  Green: " + rgb[1] + "  Blue: " + rgb[2]);
        int r =(256*256 * rgb[0]);
        int g = (256*rgb[1]);
        int b = rgb[2];
        int color32 = r+g+b;
        //System.out.println("r="+r+" g="+g+" b="+b+" color32="+color32);
        //System.out.println(color32);
        //return Integer.toHexString(rgb[0])+" "+Integer.toHexString(rgb[1])+" "+Integer.toHexString(rgb[2]);
        return Integer.toString(color32);
    }

    public static int[] getRGBArr(int pixel) {
        int alpha = (pixel >> 24) & 0xff;
        int red = (pixel >> 16) & 0xff;
        int green = (pixel >> 8) & 0xff;
        int blue = (pixel) & 0xff;
        return new int[]{red,green,blue};

  }
    public static boolean isGray(int[] rgbArr) {
        int rgDiff = rgbArr[0] - rgbArr[1];
        int rbDiff = rgbArr[0] - rgbArr[2];
        // Filter out black, white and grays...... (tolerance within 10 pixels)
        int tolerance = 10;
        if (rgDiff > tolerance || rgDiff < -tolerance)
            if (rbDiff > tolerance || rbDiff < -tolerance) {
                return false;
            }
        return true;
    }
}