Nintendo Zapper Gestural Mouse
A student found this Zapper and an NES console at the thrift store during one of my electronics hacking classes. He only wanted the console (converted it into a Raspberry Pi based game emulator) and gifted me the Zapper. I used an Arduino Pro Micro and accelerometer sensor to convert it into a mouse controlled by swinging the zapper around. Because it moves the mouse based on acceleration, it doesn't need to be pointed at the computer screen. Left click for the mouse is the Zapper trigger and I put an extra button on the bottom of the grip for right click.
Motivation
After liberating this Zapper from the thrift store, it sat on my shelf for a long time while I thought about what I wanted to do with it. While the years have erased many memories from the first ten years of my life, one that stands out clearly is the total shock of coming home one day to find that my parents had purchased an NES gaming console. The Legend of Zelda was waaaay beyond my grasp, Super Mario Brothers was just barely playable, but Duck Hunt was an immediate favorite. I remember holding the barrel of the Zapper right up against the screen, ensuring I hit every duck so that smug hunting dog would stop mocking me. With all these fond memories, I knew I had to treat this Zapper with respect. I wanted to retain some echo of its original functionality. I also wanted to minimize the visual impact of any alterations. As much as it it pained me to scrap the internal circuitry, I knew that their functionality had ceased long ago.
Process
I did a bunch of research about the Zapper before I ever opened it up. I wondered if there was some way to connect the pins of the plug to a microcontroller for some interesting purpose. One of my favorite YouTube channels had a couple great video that I found helpful:
Since the Zapper required coordination of flashing lights on the screen it was pointed at to operate, I would have to add some modern electronics to achieve my design goals. I opened it up and did an inspection.

Once removed, the optical sensor in the upper left would provide enough room for a MPU6050 accelerometer sensor that I had on hand from a project I had done with my students on tuned mass dampers (inspired by this video). The grey box in the middle housed some springs and levers that helped trigger what was essentualy a limiter switch when the trigger was pulled. The terminals of the switch were easily accessible on top. In the handle of the Zapper was a metal weight, which was almost exactly the same dimensions as an Arduino Micro Pro that I had. The Micro Pro has native USB, making a great choice for mimicking a computer input like a mouse.
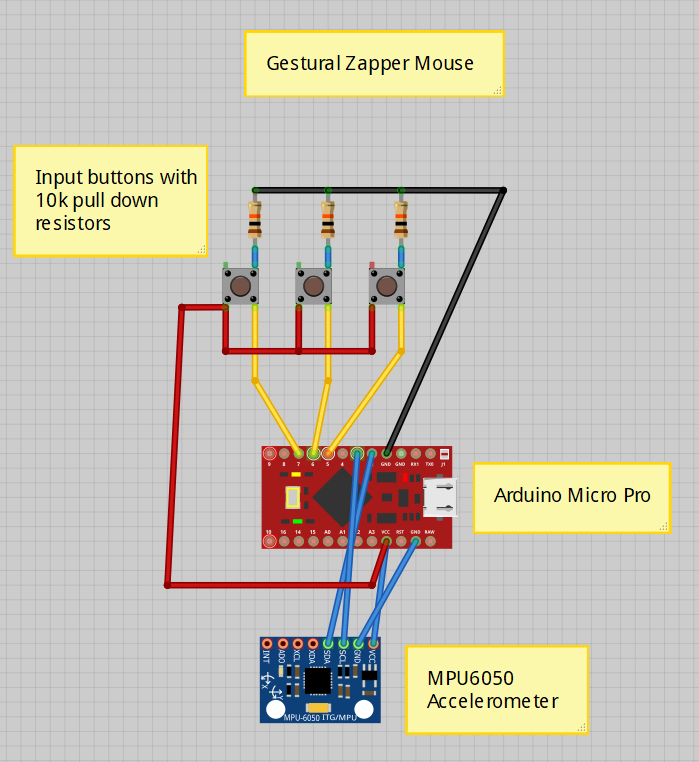
After some research, including this to-the-point tutorial, I wired up and programmed a device that would sense movements in the Zapper and translate that into movement of the cursor on a connected computer. I used the trigger as the left-click, but still wanted a right-click, so I attached some external buttons on the bottom of the Zapper (the largest visual modification I had to make. The buttons I added were scrapped from an old gaming controller and were in a pair, so I had an extra button to work with. I decided to use that button as a “reset,” which would center the cursor to the middle of the screen whenever pressed. This was useful since the cursor was moved by acceleration of the Zapper, not its absolute position. This meant that over time the Zapper would end up pointing away from the screen.